Shader Migration Guide
Bobbie's Guide to migrating shaders on Beat Saber models.
Intro
When Beat Saber updated to 1.29.4, the developers changed the render type from Single Pass to Single Pass Instanced. Unfortunately, the Beat Saber model projects were not set up to handle this change gracefully, so all models created up until this point have invalid shaders.
These invalid shaders only show up in the left eye and completely ruin a model when wearing a VR headset.
Fortunately, there is a library and .unitypackage that can help you make this transition easily, even with large model projects.
AssetBundleLoadingTools
AssetBundleLoadingTools is a library that aims to fix broken legacy models using pre-converted .shaderbundle files.
A .shaderbundle is a file that contains shaders that have been recompiled to comply with the Single Pass Instanced changes.
Unfortunately, this library of pre-converted shaders only includes common shaders like BeatSaber/Unlit and BS_Uber. If you've ever made a custom shader or downloaded one from a niche source, there's an extremely high chance it's not included.
You can fix this in one of two following ways:
- Exporting your own .shaderbundles to fix all of your old models at once (recommended)
- Converting your shaders to work with Single Pass Instancing, then re-exporting your models
Setting Up ShaderBundleExporter
The ShaderBundleExporter .unitypackage is what you'll need to fix your shaders, and can be downloaded here
Before Installation
Your model project's Unity Version is very important. If you're on Unity 2018.1.9f or lower, you NEED to upgrade your project to a higher unity version.
The minimum supported Unity Version is Unity 2018.2.0f, but it's recommended you upgrade to at least Unity 2019.3.15f to enable every ShaderExporter feature.
You can find a list of Unity Versions on the Unity Download Archive page. Make sure to backup your project before upgrading!
WARNING
If you're upgrading an older Unity project, an extremely common to see an error likeAssembly 'Assets/Runtime/CustomNotes.dll' will not be loaded due to errors:
This error is very easy to fix - just go to the .dll in your project, uncheck Validate References in the inspector, and click Apply
Installation Instructions
Simply drag ShaderBundleExporter.unitypackage into your project and click Import.
The .unitypackage is mostly self contained, and should not interfere with anything else.
Restart your project and you're finished with the installation!
Other Info
The ShaderBundleExporter adds some helpful shader warnings when exporting a model.
If you export a model that contains unconverted shaders, a warning will pop up in the console:

It's important to pay attention to these, as these shaders have a high chance of only appearing in one eye ingame. For more about converting shaders, see the converting project shaders section.
Converting Project Shaders
If you'd like to continue creating new models after the 1.29.4 update, all of your shaders will need to be updated to support Single Pass Instanced.
WARNING
If you have many public models released, it is NOT advised to manually re-export all of your models, as it will take far too much time and effort
You can easily do this by creating a custom .shaderbundle - check that section out first if this applies to you
The ShaderBundleExporter contains some useful utilities to automate shader conversion:
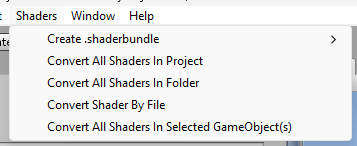
- Convert All Shaders In Project
- Convert All Shaders In Folder
- Convert Shader By File
- Convert All Shaders In Selected GameObject(s)
It's recommended that you Convert All Shaders In Project to convert everything out at once.
If you don't have much time or don't feel like potentially manually fixing up a bunch of shaders, you can always select a model and do Convert All Shaders In Selected GameObject(s) to just fix up that specific model.
You can also convert a specific shader by using Convert Shader By File.
WARNING
These actions will overwrite the .shader files found within your Unity project. It will create .shaderbackup files, but it's always recommended to backup your full project before making any big changes.
After Conversion
After converting your shaders, the Console tab will contain useful information that tells you how much of your shader library was automatically converted.
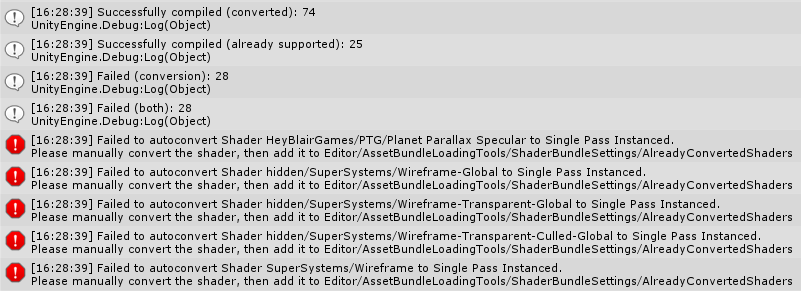
As you can see, some of these shaders couldn't be autoconverted. Most shaders - especially shaders included by default in model Unity Projects - are fairly simple, and the Shader Converter will be able to convert them without issue.
However, there's a lot of different types of shaders, and the autoconverter is only so smart. Check out the Manual Shader Conversion instructions for more info on how to fix shaders that couldn't be automatically converted.
Once you've finished converting all your shaders, you can re-export models AND export new models without worrying. Converted shaders will function properly on both old and new Beat Saber versions!
WARNING
You should double check that your shaders look fine in-VR before publishing models with them! If the autoconversion messed up a specific shader, you can always open the .shaderbackup, copy the source code into the .shader, and Manually Convert it.
Exporting Custom .shaderbundles
This is the RECOMMENDED WAY to fix your shaders if you've released a lot of models. If you're just trying to fix one specific model or export new models, check out the Converting Project Shaders section.
.shaderbundles work using the same system as automatic shader conversion. If you've already converted your shaders to Single Pass Instanced, the .shaderbundle will use those - otherwise it will try to autoconvert them without saving the changes permanently.
The exported files are also identical to any other model file. All of your shaders are compiled into a bundle, and the source code isn't in the final product - exactly like a saber, platform, avatar, etc.
The Shaders/Create .shaderbundle window contains three ways to build a .shaderbundle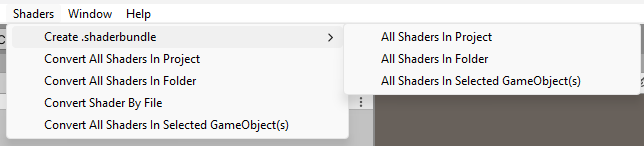
- All Shaders In Project: The recommended way to export shaders. If you export this, you will have one .shaderbundle file that can fix the vast majority of your models!
- All Shaders In Folder: Situationally useful. Good if you have a specific subfolder you want to export from.
- All Shaders For Selected GameObject(s): Can be useful for exporting shaders for multiple models at once.
After selecting one of these options, the .shaderbundle compiler will do the following:
- Get all the shaders for the relevant export type
- Use the Automatic Shader Converter to "inject" Single Pass Instanced keywords into as many shaders as possible
- Export a
.shaderbundlefile at the provided path
After Export
Once you've exported a .shaderbundle, the Console tab will contain useful information to see how your bundle export went.
There's a list of every shader that was successfully exported and some helpful stats: 
If any of your shaders are unusual and unable to be autoconverted, they'll show errors in the console: 
These errors are pretty verbose, and upon click will show more information on what exactly went wrong during the autoconversion. Read the Manual Shader Conversion instructions to learn how to fix these.
.shaderbundle Installation
Make sure you have AssetBundleLoadingTools installed so you can load your built .shaderbundle.
Go to your Beat Saber's game folder, then navigate to UserData -> AssetBundleLoadingTools -> ShaderBundles
Copy and paste your .shaderbundle into that folder so the shaderbundle libarary recognizes it.
Distributing Your .shaderbundle
You can send the .shaderbundle to whoever you want, and it should work fine as long as they follow the above instructions.
However, this is clearly not ideal if you create public models. If somebody's downloaded your old models and they don't have the bundle, they'll still be broken!
This is where the extremely important .shaderbundle autoupdater comes in. AssetBundleLoadingTools automatically downloads .shaderbundle files from a web service, and you can easily add your own bundles to this service.
To add your bundles to the autoupdater, do one of the following:
- Contact Bobbie#0001 on discord
- Ask about it in the
#pc-3d-modelingchannel in the BSMG Discord - Open a Pull Request on the repository if you know what you're doing
Once your .shaderbundle is added to the web service, everybody on new versions of Beat Saber will receive fixed versions of your shaders, making their experience smooth and not requiring them to hunt down updated copies of your models.
Manually Converting Shaders
Sometimes the autoconverter will fail to make a shader support Single Pass Instanced. This can happen for many reasons, and a specific reason is usually printed as an error message. When this happens, you'll need to manually convert following these steps:
Check If It Already Works
First, test if the shader already works! Some shaders are already converted to work with Single Pass Instanced, but the autoconverter can't detect it properly. This generally happens with complex shaders that use a lot of .cginc files, like BS Uber and Poyomi
If you're exporting a .shaderbundle:
- Go to the settings in
Editor/AssetBundleLoadingTools/ShaderBundleSettingsand enableExport Broken Shaders. MAKE SURE TO TURN THIS OFF & RE-EXPORT BEFORE SHARING YOUR SHADERBUNDLE! - Load a legacy model that uses the same shader and see if it's only rendering in one eye
If you're converting your project's shaders:
- Export a model that uses the shader that failed to convert
- Load the model ingame and see if it's only rendering in one eye
If you've completed this step and it's already rendering properly, congratulations, you don't need to do any conversion!
Navigate to Editor/AssetBundleLoadingTools/ShaderBundleSettings and either drag the shader onto Already Converted Shaders or add the shader's name in Already Converted Shader Names
Add Single Pass Instanced Keywords
If your shader still doesn't work, you'll need to manually add the necessary keywords to support Single Pass Instancing.
Detailed instructions can be found on this official Unity Guide
After completing the official Unity instructions, follow the steps in Check If It Already Works to make sure your shader works and if so, add it to your Already Converted Shaders
Manual Conversion Isn't Working
Shaders can be fairly complex and these rules don't always apply.
If you're not familiar with shaders, have questions about the general shader conversion process, or need help converting a specific shader, please ask in the #pc-3d-modeling channel in the BSMG Discord