Custom Avatars Guide
Assistant's Guide to adding Full Body Avatars to Beat Saber.
DANGER
If you're creating models, it's extremely important that you read the Shader Migration Guide to avoid any shader issues
DANGER
This guide may have outdated fragments. If you run into issues don't be afraid to ask in the #pc-3d-modeling channel in the BSMG Discord
Introduction
Alright boys and girls, your favorite Assistant is going to teach you how to take your favorite anime models and put them into 3D Osu!
I will be assuming you have a basic grasp of blender and Unity and have made avatars for VRChat in the past. If not there's plenty of tutorials out there. This guide will start at the point when you're ready to export a fbx file to use on Unity. There is a video of me creating an avatar if you'd like something to follow along with. It is narrated by Megalon since a freak accident took away my ability to speak and edit videos. CC's coming soon™.
Shape Keys: Turning Bad Touch into Good Touch
So you don't want your waifu to hold the sabers through the sheer power of plot armor and sticky hands, but she doesn't have a fist shape key. To add one, we'll be using blender again, now I know I said we were ready to export, but I'm like 12 and have the attention span of
We'll be using the CATS blender plugin, If you don't have it installed, download it here.
Under the CATS menu.
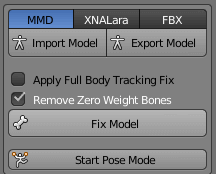
Click Start Pose Mode.

With pose mode enabled, you'll be able to position the bones to your liking. Right Click to select the bones, use SHIFT to select multiple.

When you've gotten the desired look, click Pose To Shape Key. This will create a shape key for closing a fist.

To finish up, hit w and click Clear User Transforms (All), this will reset the hand's pose.
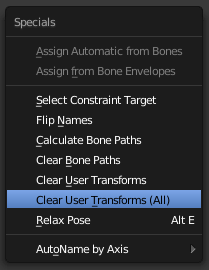
Then hit Stop Pose Mode.

To Unity and Beyond
Download and extract the BeatSaberCustomAvatars-vx.x.x-UnityProject.zip from the Custom Avatars Release. This zip contains a barebones Unity project to get started with creating avatars. You will need to copy FinalIK.dll and DynamicBone.dll from the game's installation folder into the Assets\Libraries folder of the extracted zip before opening the project in Unity to get it working.
IMPORTANT
Use Unity version 2019.3.15. And make sure to follow these instructions.
Import the fbx file with your waifu, and create an empty game object with her name, but don't drag her in yet.


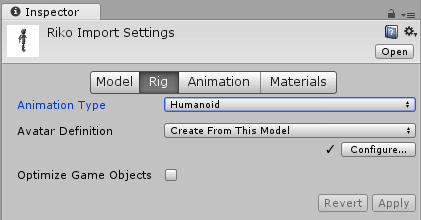
Next step will be to click on the Avatar asset, and set its rig as humanoid, and then configure it. If you've worked with VRChat avatars before this should sound familiar, so I'll skip the configuration, which basically is just match the body parts and enforce T-Pose. After doing that you can drag your Avatar into the GameObject that you created before.
Create 4 Empty GameObjects in the root object, and name them Head, Body, LeftHand, and RightHand.
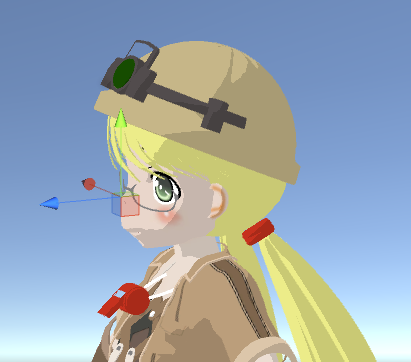
You want to position Head where you want your camera to be, similar to VRChat's white dot.
For both LeftHand and RightHand, you want to position them on your Avatar's hands like if they were your controllers. The positive Y axis points up from the controller, so you want that to point towards your wrists.

IMPORTANT
Make sure you have your GameObjects where you want them, after the next step their position is final.
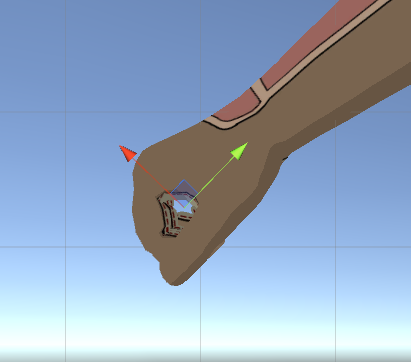
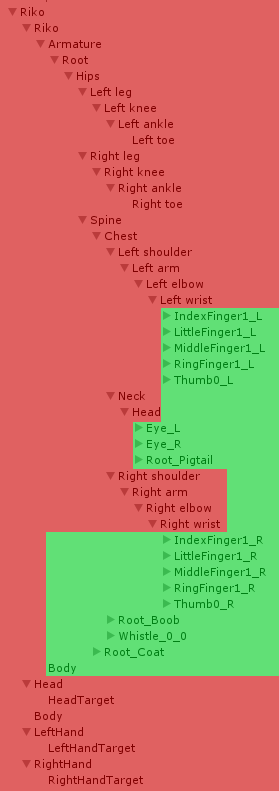
We're ready to start the fun! Navigate the hierarchy of the Armature until you reach the Head, select it and right-click and Create Empty, then drag it into the Head we created and name it HeadTarget. That process will make sure that it's in the correct place.

Do the same with your wrists, placing them into the LeftHand and RightHand, and name them LeftHandTarget and RightHandTarget respectively. It should look something like this.

IMPORTANT
If you need to move Head, LeftHand, or RightHand AFTER you've already placed the targets, you'll need to delete the targets and add them again after you're done moving them.
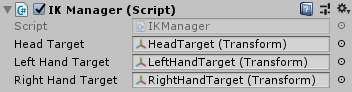
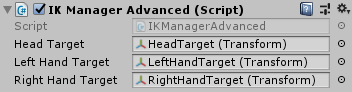
Select your Avatar, the one that is blue in my previous image, and add some components to it: First you'll need VR IK and IK Manager, or you can use IK Manager Advanced if you want to change the IK settings. Add the 3 targets you just created to the IK Manager of your choice.
You should have a fully functional avatar for Beat Saber, but don't hit that export button yet, we still need to give it the finishing touches. Once you're done testing out the Avatar in Play mode and IK is working, you'll have to set all your materials to use one of the included Beat Saber shaders, if you've atlased your materials, great, you get to skip the painstakingly arduous job of retexturing each one of them, because for some reason those shaders don't take the same texture parameter as most other shaders.
You might have noticed that your avatar crosses its legs like it needs to pee when it crouches down. You might have played around with the IK options and noticed that changing the Swivel Offset on the legs fixes this in unity, but the changes don't appear in the game. Now you can fix that by using IK Manager Advanced. Adding the swivel offsets to the IK Manager Advanced component will make those settings work in the game. If you haven't played around with those before, they change the angle at which the knees bend. A positive value moves the knees to the right, and a negative value moves them to the left, from the avatar's perspective.
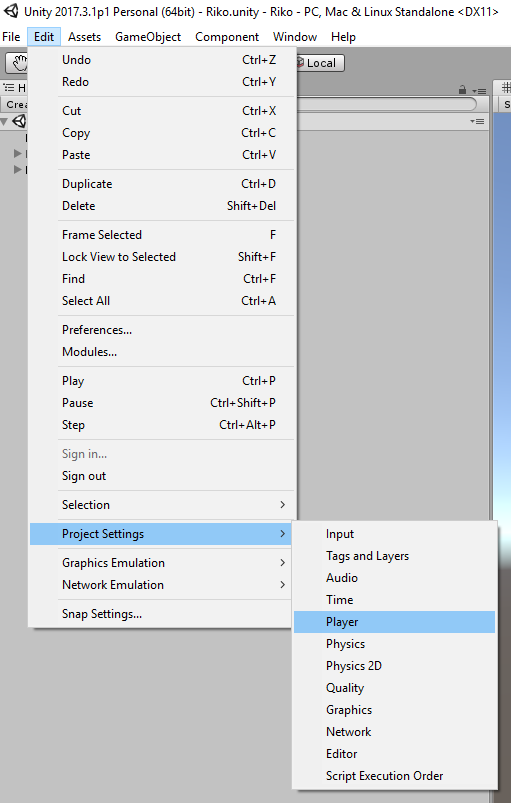
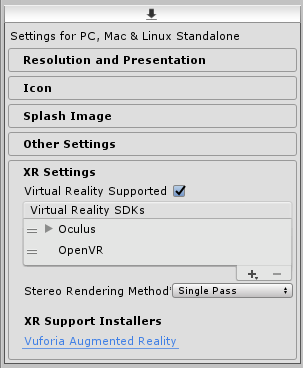
You can now go ahead and do cosmetic stuff to your avatar, add dynamic bones to your liking, but use the included scripts. You can also curl your waifu's fingers so she's actually holding the sabers, I used Shape Keys for that. Avatars are now visible in first person view. You can toggle it using the Home key on your keyboard. If you want to be able to see your avatar in first person, but don't want to see the inside of your head, you can use the First Person Exclusion component to exclude your head's mesh, note that it will have to be a separate mesh for this to work. If you have double vision of your avatar, like if you were cross eyed, you need to change a setting. Go to Edit -> Project Settings -> Player. On the window that appears click on XR Settings, Make sure that Virtual Reality Supported is turned on, and that Stereo Rendering Method is set to Single Pass.
Final Stretch
Select the parent to your avatar, the upmost item in the hierarchy, and add 2 components to it, Avatar Descriptor and Event Manager. Fill out the Avatar Descriptor, and you can leave Event Manager empty, if you knew how to use it you would probably not be reading this.
![]()
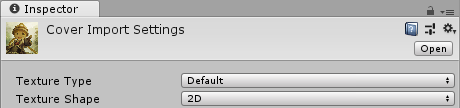
To add a Cover Image you'll need to add an image and set it as a Sprite (2D and UI), you can then drag it into the Avatar Descriptor.
![]()
The last thing to do is export the avatar. Go to Window -> Avatar Exporter, and you should see something like this. Just click on the Export button, and save it to the CustomAvatars folder, and you're golden.

IMPORTANT
If you're re-exporting an avatar make sure to delete the previous file, it will not overwrite it.
NOTE
Once you've got your avatar exported, upload them to ModelSaber if you want to share it with the world.
Now go weeb out to the Nico Nico Nii remix as your waifu or something. Assistant out.
Animations: It's Alive
For the purpose of this guide an animation will be considered any behavior that is not directly caused by the IK scripts or the movements of the HMD and controllers. The most basic form of animations involve what you're probably familiar with, Animation files, an Animator Component, its corresponding Animation Controller, and Events. First we need to place an Animator component, and we have to be very particular about how we do this. Just playing it on the avatar object will cause it to conflict with the IK scripts, so we have two options: We can set the animation layer in the Animation Controller to Additive Blending, which will allow us to place the Animator Component on the avatar object.
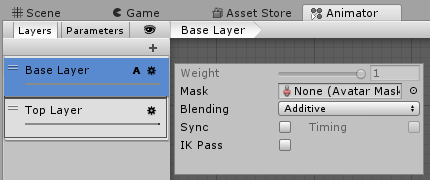
The second way, and my prefered method, is to leave the layer as Override Blending and place the Animator Component on an object that isn't affected directly by the IK script, nor is a parent to any such object. This is an example of where you can safetly place the Animator Component, and where you can't.
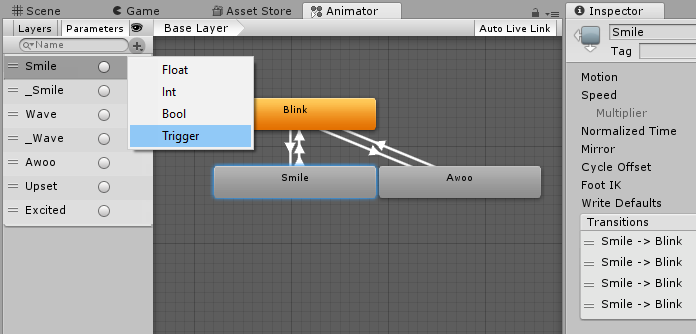
Once you have your Animator Component and its respective Animation Controller you'll need to add Animation files to it, and make sure to create Trigger Parameters, set transitions between states, and set the Trigger Parameters to set off those transitions. For animations of set duration you can create a single Trigger Parameters to start the animation, and leave the transition back empty, but for animations that you want to hold for an arbritrary amount of time you'll want to create a Trigger Parameters to start the animation, another to end it, and set the animtion to looping.
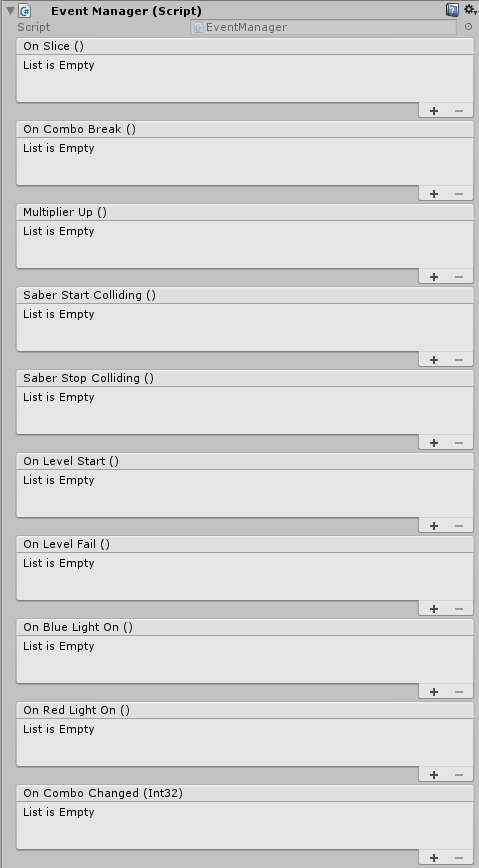
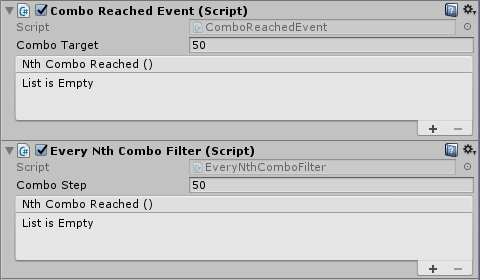
Now that you have an animation layer with transitions and triggers, you'll need to set up events to fire them. First you'll want to create an Event Manager component on the root object. This provides some events that you can use, and also allows other event scripts to work. The vanilla CustomAvatar.dll also comes with the Combo Reached Event and Every Nth Combo Filter.
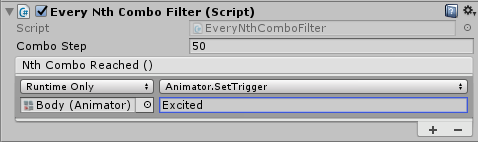
Once you've selected which event you want to use for your animation, you need to select the Object that contains the Animator Component, then select Animator -> SetTrigger (string) as the function, and type the name of your Trigger Parameter in the text field.

Once the event is setup, when it fires it will activate the trigger, which will activate the transition on your Animation Controller. If you want to setup controller events similar to VRChat gestures, you'll want to set a trigger to activate your transition on a press event, and another for the deactivation transition on a release event.
Events
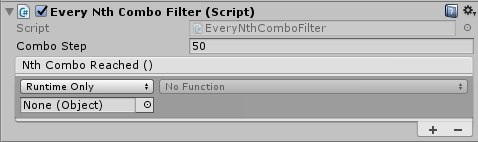
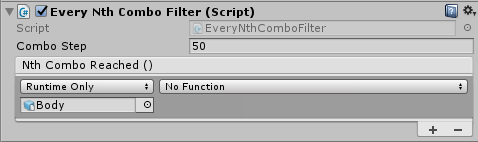
We've seen how to use events to make animations happen, but there's a lot more that you can do with them. First lets look at what an event looks like. There's 4 parts to an event that you have to worry about. First, what triggers the event. It can be any of the things in the Event Manager component, or the combo components, or even from a third party plugin, like CustomKeyEvents. Second, you need to drag a game object into the field that says None (Object), whatever object you pick will be the one affected by the trigger. Third, you have to select which function from that game object you want to use. Click on the field that says No Function and pick the function you want the event to use. Here you will see all the public methods with at most 1 argument that are available to the object or its components. Finally, under the function you just picked you will be able to set the argument to that function, if any.
We saw how to do this with the animator component on the previous section, but you can use this for many other things besides triggering events. You can make it play audio clips using the PlayOneShot function from an Audio Source component. You can start particle systems, or make them emit a certain number of particles. You can turn objects on and off. You can edit materials. There's endless posibilities, so go drag some objects in and see what you can get out of them.
CustomKeyEvents
This plugin allows you to set event triggers to controller actions. You will need CustomKeyEvents.dll (Unity Asset) in your Unity project in order to add those to your avatar. The user will also need CustomKeyEvents.dll in their Plugins folder for them to work in game.
Full Body Tracking: Ra Ra Rasputin~
If you want to create an avatar with Full Body Tracking support you'll have to add 3 more Objects, one for each of the Vive Trackers in your feet and hip. Place those Objects in the same level you placed the ones for the hands, and name them LeftLeg, RightLeg, and Pelvis.

These Objects work exactly the same way as the hand objects, you want to position them on the Avatar like they're positioned physically on your body. Make sure to pay attention to the orientation of the tracker.
![]()
![]()
Now that they're in the correct place, you'll want to create the targets by navigating the Armature to the feet and pelvis bones, the ones the IK calls Left Foot, Right Foot, and Pelvis. Right click on those bones and select Create Empty. An Object called GameObject will appear as a child to the bones, you want to rename them into LeftLegTarget, RightLegTarget, and PelvisTarget and drag them into LeftLeg, RightLeg, and Pelvis respectively.
Once complete your hierarchy should look something like this:

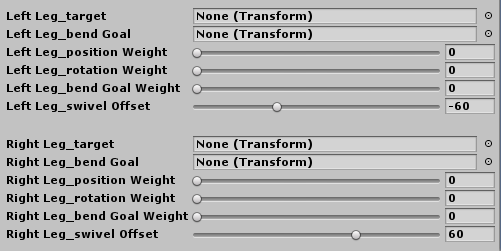
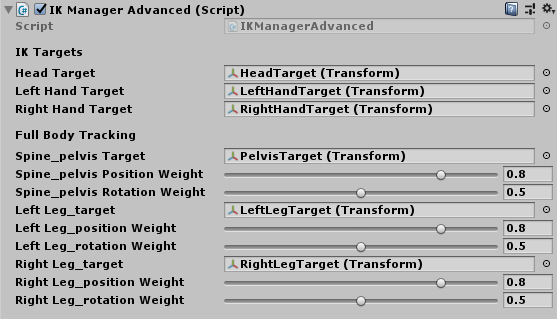
Now that all your Objects and Targets are ready, you'll have to add them to the IK Manager Advanced script. You also want to set the values of both leg's and pelvis' Position Weight and Rotation Weight closer to 1, but feel free to experiment with the values.
Unity 2019
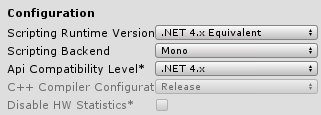
So, you're probably wonder why now I'm telling you to use Unity 2019.3.15f1, when previously we said you shouldn't use any 2019 version. Well, the game has changed, figuratively, and literally. Beat Saber now uses Unity 2019 and as such the avatars need to be created with Unity 2019 to work correctly. You may need to set the Scripting Runtime Version to .NET 4.x Equivalent if it isn't already. For that you need to go to Edit -> Project Settings -> Player and in the window that appears open the Other Settings tab, and scroll down to the Configuration section.
You're going to need to use the new version of CustomAvatar.dll in your Unity project. Delete the old one if you have it; this project contains the correct one—and replace it with this one. Preferably in the assets folder while Unity isn't running. You might have to re-add your components. If the asset doesn't have the arrow that lets you see all the scripts, right click it and select Reimport.

FAQ: TL;DR:RTFM
PureDark's avatar plugin?
PureDark's plugin has been integrated into the main plugin. A few things have changed. Make Children Visible is no longer needed, first person view is enabled by default, and is toggleable with the Home key on your keyboard. To add exclusions to the first person view, you can use the First Person Exclusion component. Avatar VRIK Fix is now called IK Manager Advanced, and since it's all in one plugin it's no longer needed to provide cross compatiblity, so only one of either IK Manager or IK Manager Advanced is needed. The controller events components were removed, and will appear on their own plugin.
I can't find the IK scripts or the Avatar exporter
Make sure you're using Unity 2018.1.6f1, not 5.6.3p1, not 2017, and you've followed these directions. If your CustomAvatar.dll asset doesn't have the arrow that you click to show the scripts, try deleting and re-importing the CustomAvatar.dll Asset to Unity.
I can export avatars but they're invisible in game. ↵
You can toggle first person view by pressing Home. If they're invisible in your desktop window, make sure that you used the correct Beat Saber shaders, and Unity 2018.1.6f1.
Only my avatars are T-Posed
Well I'm very sorry, but this means that you did something wrong while creating your avatar. There's no way to know just what you did wrong, because so many things have the same effect. The only advice we can give you is make sure that you followed the guides exactly, and maybe watch a video to follow along.
Videos
Here is a video of me making an avatar, narrated by Megalon. [5:57]
https://www.youtube.com/watch?v=iBEfl_v71Nw is not a valid YouTube URL!
DISCLAIMER
I know nothing about making avatars or using either Unity or Blender, I just threw shit at the wall blindly for 3 days and this is what stuck. But until someone who actually knows what they're doing makes a guide, this is all there is.
♥ Special Thanks
- ikeiwa, for creating this fantastic plugin.
- xyonico, for rewriting this fantastic plugin.
- PureDark, for making the fantastic plugin that fixes many issues.
- Emma, for making the first guide that led me to figuring this out, and helping with this one.
- Megalon, for providing the ASMR for the video.
- Ella, for making fun of me until I got gud, helping with the website design, parts of this guide, and putting up with all my dumb questions.