PC Mod Development Intro
Learn how to get started writing your own PC Mods.
Getting Started
WARNING
This guide is for making mods for the PC version of Beat Saber!
If you want to develop mods for the Quest Standalone version of the game, visit the Quest Mod Development Guide
Make sure your game is modded before trying to make a mod.
See instructions for modding Beat Saber on PC.
This guide assumes you have a basic to intermediate understanding of C# and Unity.
You may have difficulty understanding what is covered here if you do not have this foundation.
Beat Saber is made in Unity 2022.3 using C# with .NET framework 4.7.2. To make writing and building mods as simple as possible you will need to download an IDE that supports Unity.
This guide will be focused on JetBrains Rider, however you can also use Microsoft Visual Studio Community. Both of these are good options, however, the guide for Rider users is more up-to-date.
We will now cover setting up Rider for modding. For Visual Studio users, refer to the Visual Studio Setup page.
Modding Tools Setup
We will be using the BeatSaberModdingTools (BSMT) extension in this tutorial, as it comes with modding templates and useful features, like saving your Beat Saber directory.
Firstly, download and install Rider from their website. Rider is free for non-commercial use.
The Rider extension can be downloaded from GitHub. Download the BSMT Rider zip.
Once you have installed Rider open it and, after signing in, you will be greeted by the welcome window. In the bottom left, click Configure, click Settings, then look for Plugins.
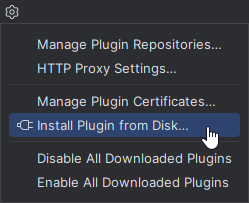
Next to Marketplace and Installed there will be a settings icon, click this, and click Install Plugin from Disk.... From here, find the BSMT Rider zip you downloaded and select it, this will install the plugin in Rider.

Template setup
BSMT comes with some working plugin templates to get you started as quickly as possible.
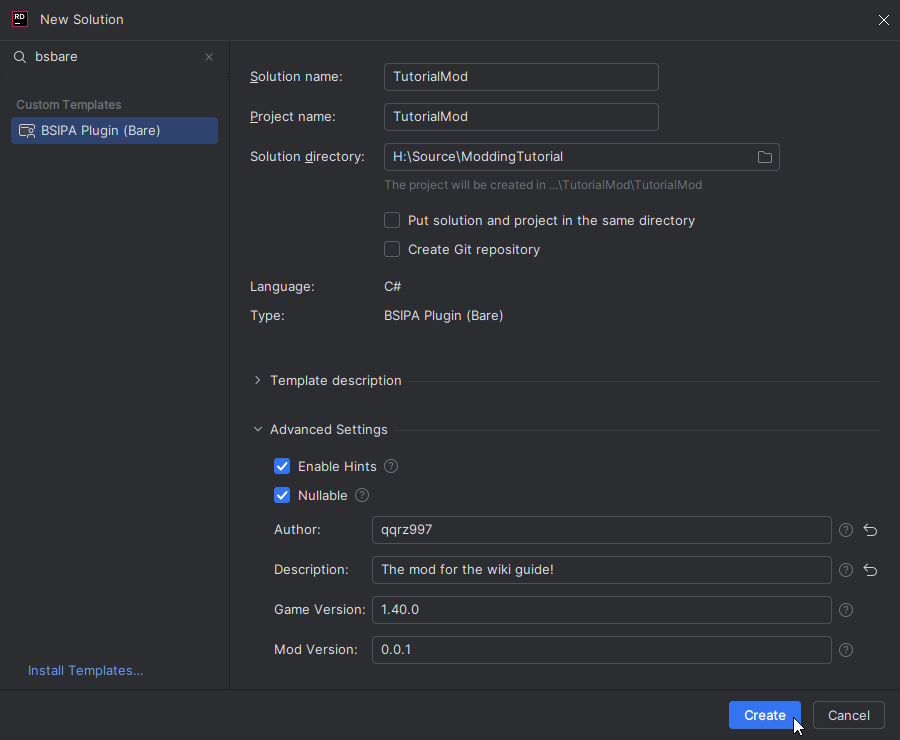
Create a new solution and, if you installed BSMT correctly, you should be able to select a plugin template from the Custom Templates list. We are going to use the bare template in this example and, later on, we will be building a functional mod completely from scratch.

Choose a name for your mod and the location you want to save it. Do not save the solution in your Beat Saber installation folder lest you lose it.
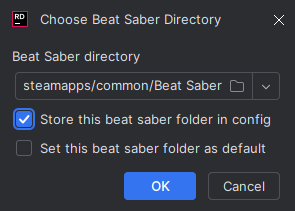
Once you're done, click Create and the mod template will open. Next, you will receive a popup asking you to set your Beat Saber Directory.

Select your Beat Saber game's installation, you can also use a BSManager instance here too. If you select Store this beat saber folder in config, BSMT will remember this directory whenever you reopen a project.
At this point, try and build the project, and it should automatically find the references for you and the build should succeed if you set a valid Beat Saber installation directory. You can do this with the build hotkey or the button on the top bar.

If you get any immediate errors, you may want to double-check the Beat Saber directory you provided. You can change it by navigating to the Tools section at the top of the Rider window, and locating the BSMT Project Tools option. If you still get errors, you can try restarting Rider.
Once again, if you have any issues you can't resolve, you can always ask questions in the #pc-mod-dev channel in the BSMG discord.
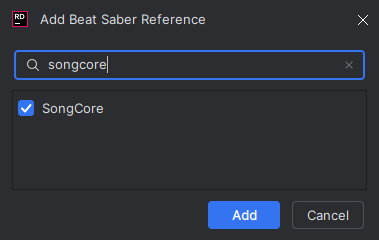
If you need to manually add Beat Saber assembly or other mod references, right click on Dependencies in the Project folder, then Add Beat Saber assembly references. This will let you search for Beat Saber assemblies, and it will add them to the .csproj for you.

Inspecting the Code
Open the explorer on the right side of Rider and you should see all the project files.
| Filename | About |
|---|---|
PluginName.csproj | This is the C# project that contains build information. |
PluginName.csproj.user | This is where the Beat Saber directory is saved. BSMT will manage this for you. |
Plugin.cs | The main file that is loaded for your mod. This is the entry point for BSIPA. |
Directory.Build.props | Contains metadata for your plugin like the version, links, dependencies etc. |
Edit your mod's manifest
Defining Metadata
Open Directory.Build.props and fill in your mod's information in the Plugin Metadata PropertyGroup:
- The
PluginIdandPluginNamekeys are used to identify your mod. Mods that will be uploaded to BeatMods typically should have these be exactly the same and have no spaces. - The
Authorsis where you use your name. - The
Versionis the version of your mod. This follows Semantic Versioning. - The
GameVersionis the exact version of the game you are making the mod for. It's recommended to make mods for the latest version of the game with mod support. - In the
Descriptionprovide a short sentence or two about what your mod is/does.
There are also some optional properties you can add:
- The
ProjectSourceis a URL to the source code of your mod. Most mods have their source code open on GitHub, for instance. - The
ProjectHomecan be a URL to a website where your mod is downloaded from or hosted. - You can also specify a
DonateURL, which if you want to, you can set up a way for people to support your modding work. - The
PluginIconis a path to a.pngfile that can be pulled from your plugin.
Defining Dependencies
Underneath the plugin metadata is an ItemGroup that declares which other mods are required for your mod to work.
WARNING
Do not remove the dependency on BSIPA. This is required by BSIPA itself.
The template in this case only needs BSIPA to work. Add additional DependsOn members for each dependency.
Some example mod libraries that are commonly used could be BeatSaberMarkupLanguage, which is used to generate custom menus in Beat Saber, or SiraUtil, which is used to interface with the game's Zenject system to easily access certain game objects and build robust large plugins. These will be briefly covered with some examples later on this wiki.
Additional Properties
- If your mod breaks in the presence of another mod due to conflicting behavior, you should add it as a
ConflictsWithmember, which will make your plugin not load if the specified conflicting mod is installed. - If your mod interacts with other mods but does not need them in order to function, consider adding
LoadAfterto ensure your mod doesn't try to interact with them before they are loaded by BSIPA. - Similarly, you can add
LoadBeforemembers to make your mod load before the specified mod. - If you want to move
Plugin.csto somewhere else in the project, usePluginHintto specify where it is so that BSIPA can find it. - You can add numerous
RequiredFileproperties to specify external files required by the mod, typically used for libraries.
Once you've set all of this, BSMT will automatically generate an embedded manifest.json in your mod during build, which is required by BSIPA and can be used to pull information about the mod.
This data can also be pulled from BSIPA to be used within your mod, and by other mods.
Compiling
After running the build, your compiled DLL should automatically be copied to the Plugins folder in your Beat Saber directory, which will be done for both debug and release builds.
When you are ready to release your mod, find the dropdown next to the build icon, and select the Release option to make a Release build of your mod. Building in Release mode will generate a packaged .zip file ready to distribute. This zip file should appear in \bin\Release\net472\zip\ but you can always look at the build output tab to find the zip destination directory.
Testing your mod in-game
To test if your mod is loaded in-game, you will need to launch Beat Saber with the BSIPA Console enabled. For more information on launch arguments, see here.
When you launch the game, you should see BSIPA load your mod in the console window.

If you got this far, congratulations! You are now set up to create mods for Beat Saber.
From here, you should consider checking out the other pages of this wiki to learn about some of the libraries modders use to add functionality to their mods, as well as learning to use some essential tools. If it helps, you can follow the full mod guide too, which will cover designing a mod from scratch.