Creating Beat Saber UI
BeatSaberMarkupLanguage (BSML) is the most common way to create customized UI in Beat Saber. BSML is effectively a tag-based language that mimics the GameObject hierarchy of Unity. It parses tags into GameObjects, and attaches the relevant Unity and Beat Saber UI elements to them.
The documentation for all BSML components can be found here.
Getting Set Up
Of course, if you want to add BSML in your mod, make sure that you have it installed in your game, and your project is referencing BSML.
Creating the BSML file
You can name the file anything you want, just make sure that its file extension is .bsml.
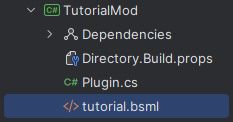
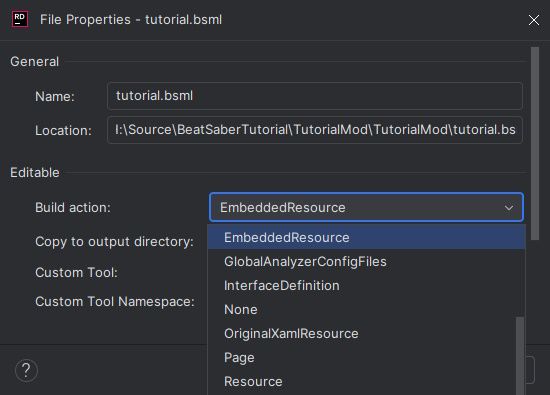
BSML will require that the bsml file be embedded in the assembly. You can do this by right-clicking the file in the explorer, going to properties, and then changing the build action to EmbeddedResource.
Writing in BSML
If you're using Rider, you may have to add a file association for .bsml files to get basic syntax highlighting. To do this, go to File | Settings | Editor | File Types and search for XML. Add a new file name pattern as *.bsml. This will make Rider accept .bsml files as XML files and do highlighting accordingly.
To get autocompletion in a BSML file, you will need to provide a schema. A way to do this is to use the background tag and add the schema to it:
<bg xmlns:xsi='http://www.w3.org/2001/XMLSchema-instance'
    xsi:noNamespaceSchemaLocation='https://monkeymanboy.github.io/BSML-Docs/BSMLSchema.xsd'>

</bg>
Rider may prompt you that the resource is not found. Simply right click on the URL, or press Alt+Enter, and select fetch external resource.
Once set up, you should have basic autocompletion for tags if you start typing inside the <bg> tag.
Running Code In The Menu
There are a couple different ways you can display your BSML in game, however, it is first important to note that you should not call any of the methods mentioned below outside of the main menu. You should make sure the game has finished loading the main menu before doing anything.
- The recommended method, if you don't already use SiraUtil, is BSML's own
MainMenuAwaiterclass that has an event calledMainMenuInitializingthat is invoked when the main menu loads - If you are using SiraUtil, it is recommended to bind a type with a
Location.Menu, or on theMainSettingsMenuViewControllersInstaller - BS Utils also provides events in
BSEventsand they are calledearlyMenuSceneLoadedFreshandlateMenuSceneLoadedFresh - You can use the game's
GameScenesManagerand thetransitionDidFinishEvent, then check if the outputScenesTransitionSetupDataSOis aMenuScenesTransitionSetupDataSOusing a type test expression - If you want to get an event when the main menu loads yourself, you can use Unity's SceneManager and check the name of the loaded scene manually, however this is a lot more effort than all of the other methods
- You could also use a Harmony patch into a method that will run every time the menu reinitializes, but this is also unnecessarily complicated
Adding Menus
Once you have code running in the main menu, it's time to decide where you want to display your UI.
Mod Settings
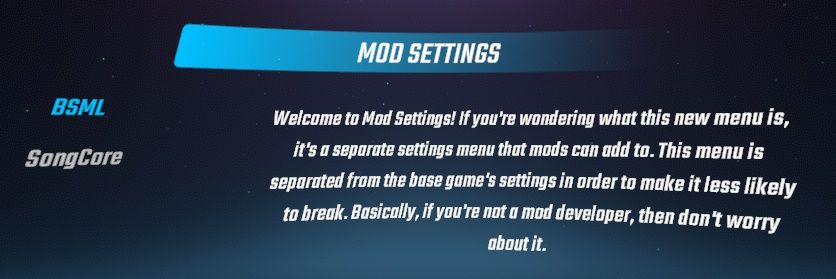
The mod settings menu is added by BSML and can be accessed from a custom button in the main menu settings. To register your own tab, check the BSMLSettings class. TutorialMenu is just a normal class.
private readonly TutorialMenu tutorialMenu = new TutorialMenu();

public void AddSettingsMenu()
{
    BSMLSettings.Instance.AddSettingsMenu(
        name: "Tutorial Mod",
        resource: "TutorialMod.tutorial.bsml",
        host: tutorialMenu);
}
Gameplay Setup
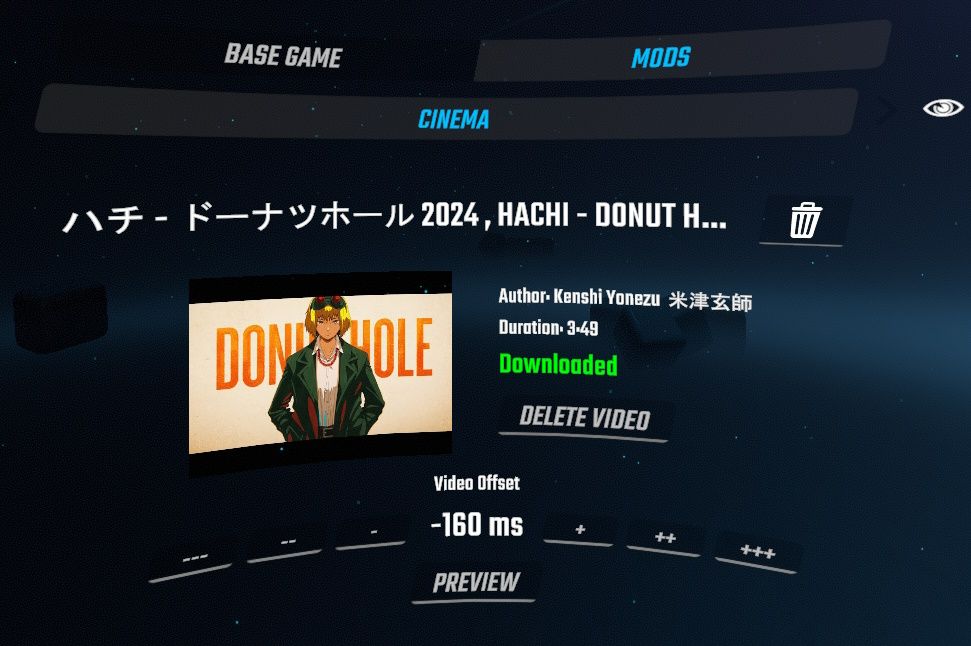
The mods tab is added by BSML in the Gameplay Setup menu, which is found to the left of the song list, where you can normally find player settings and gameplay modifiers. To register a new tab, check the GameplaySetup class. TutorialMenu is just a normal class.
private readonly TutorialMenu tutorialMenu = new TutorialMenu();

public void AddTab()
{
    GameplaySetup.Instance.AddTab(
        name: "Tutorial Mod",
        resource: "TutorialMod.tutorial.bsml",
        host: tutorialMenu);
}
Custom Flow Coordinator
BSML gives you a way to create a button in the left screen of the main menu. This button can do anything you want it to do, but most modders make it present their mod's UI. This is done by using a FlowCoordinator, and by adding one or more ViewController objects to it.
BSML provides methods to create both flow coordinators and view controllers, which makes this process a lot cleaner.
BSML has a few choices of view controller types you can inherit; we are going to use the BSMLAutomaticViewController because it has the option of hot reloading the menu when you make changes to the bsml file.
[ViewDefinition("TutorialMod.tutorial.bsml")]
public class TutorialViewController : BSMLAutomaticViewController { }
The flow coordinator is responsible for managing view controllers. FlowCoordinator has many members that you can use or override, so it's worth checking out the code for it.
public class TutorialFlowCoordinator : FlowCoordinator
{
    private readonly TutorialViewController tutorialViewController = BeatSaberUI.CreateViewController<TutorialViewController>();

    // Called immediately when the flow coordinator is activated
    protected override void DidActivate(bool firstActivation, bool addedToHierarchy, bool screenSystemEnabling)
    {
        if (firstActivation)
        {
            // Sets the title text in the top bar
            SetTitle("Tutorial Mod");
            showBackButton = true;
        }

        if (addedToHierarchy)
        {
            ProvideInitialViewControllers(tutorialViewController);
        }
    }

    protected override void BackButtonWasPressed(ViewController topViewController)
    {
        BeatSaberUI.MainFlowCoordinator.DismissFlowCoordinator(this);
    }
}
The code below is related to managing the menu button. We tell the MainFlowCoordinator to present our own flow coordinator. You can also have your own way to dismiss your flow coordinator but, in the example above, we are relying on the back button to do this.
private readonly TutorialFlowCoordinator tutorialFlowCoordinator;
private readonly MenuButton menuButton;

public MenuManager()
{
    tutorialFlowCoordinator = BeatSaberUI.CreateFlowCoordinator<TutorialFlowCoordinator>();
    menuButton = new MenuButton("Tutorial Mod", ShowFlowCoordinator);
}

public void AddMenuButton()
{
    MenuButtons.Instance.RegisterButton(menuButton);
}

private void ShowFlowCoordinator()
{
    BeatSaberUI.MainFlowCoordinator.PresentFlowCoordinator(tutorialFlowCoordinator);
}
Floating Screen
If you want to place your UI components anywhere, you can create a floating screen. This will allow you to have a view controller anywhere in the world. You can also create a handle for the floating screen which will allow the player to move the screen around.
The example below creates just creates a small screen near the ground in front of the player's place.
private readonly TutorialViewController tutorialViewController = BeatSaberUI.CreateViewController<TutorialViewController>();

public void CreateFloatingScreen()
{
    var floatingScreen = FloatingScreen.CreateFloatingScreen(
        screenSize: new Vector2(25f, 10f),
        createHandle: false,
        position: new Vector3(0f, 0.5f, 2f),
        rotation: Quaternion.Euler(45f, 0f, 0f));

    floatingScreen.SetRootViewController(tutorialViewController, ViewController.AnimationType.None);
}
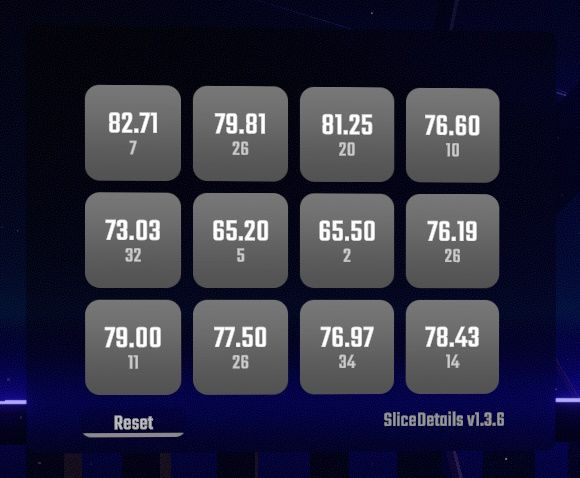
Since floating screens aren't part of the screen system, and because the menu persists during gameplay, you can have the floating screen active in the game scene. The below screenshot is of the floating screen from SliceDetails, which is activated when the game is paused.
Interacting With The Menu
Now let's take a look at some of the ways you can make use of your UI. Again, to find out more about the components that we will talk about in the following sections, check the BSML documentation.
Buttons And Actions
We are going to add a button to the menu:
<button on-click="ButtonClicked" text="A Button"/>And add the corresponding method in the object host or view controller:
public void ButtonClicked() => Plugin.Log.Info("Button Clicked");Now, ButtonClicked() will get called whenever our button is clicked.
If you want to run a different method or a method with a different name to the one specified, you can use the UIAction annotation and specify the name:
[UIAction("ButtonClicked")]
public void SomeMethodName() { }
UI Components
BSML components must be part of and accessed from the provided host object or view controller. To access the instance of a BSML component, you must give one an id:
<text id="textComponent" text="Hello World!" align="Center"/>And then add it in the object host by adding a UIComponent annotation:
[UIComponent("textComponent")]
private readonly TextMeshProUGUI textComponent = null!; // assigned by BSML
If you want to have initialization logic for components in your UI, do not use Unity's Awake() or Start() or a constructor, instead use the post-parse event provided by BSML. This will be called after all of the UI has been created and all components on the object host have been assigned a value.
[UIAction("#post-parse")]
public void PostParse()
{
    textComponent.text = "The text has changed.";
}
Settings And Values
There are many different ways to get input values from BSML. Let's take a look at the toggle and slider settings:
<vertical child-expand-height="false">
    <toggle-setting value="ToggleValue" text="Toggle Example" apply-on-change="true"/>
    <slider-setting value="SliderValue" text="Slider Example" apply-on-change="true"/>
</vertical>
We use apply-on-change to make the property get set when the input value changes, otherwise you would need to use INotifyPropertyChanged when you want to apply the values, which can still be useful if you want to manually do it.
private bool toggleValue;
private float sliderValue;

public bool ToggleValue
{
    get => toggleValue;
    set
    {
        toggleValue = value;
        Plugin.Log.Info($"Toggle set to {value}");
    }
}

public float SliderValue
{
    get => sliderValue;
    set
    {
        sliderValue = value;
        Plugin.Log.Info($"Slider set to {value}");
    }
}
If you want a property with a different name to the one specified, you can use the UIValue annotation and specify the name:
[UIValue("ToggleValue")]
public bool SomePropertyName { get; set; }
Displaying Data
As well as taking input in your UI, it's very common to need to display data. Let's add a list:
<list data="ListData"/>And set the data through a property:
private IList<CustomListTableData.CustomCellInfo> ListData =>
[
    new("A list cell", "and"),
    new("Another list cell", "and"),
    new("Another list cell", "that is all.")
];
Or alternatively, you can grab the CustomListTableData component from the list by adding an id and use that:
[UIComponent("List")]
private readonly CustomListTableData list = null!; // assigned by BSML

[UIAction("#post-parse")]
public void PostParse()
{
    list.Data = [
        new("A list cell", "and"),
        new("Another list cell", "and"),
        new("Another list cell", "that is all.")
    ];
    list.TableView.ReloadData();
}