Quest Mod Development Intro
Learn how to get started writing your own Quest Mods.
Getting Started
WARNING
This guide is for making mods for the Quest Standalone version of Beat Saber!
If you use Oculus Link or similar, you want to visit the PC Mod Development Guide as that uses the PC version of the game.
This guide assumes you have a basic to intermediate understanding of the following:
You may have difficulty understanding what is covered here if you do not have this foundation.
While this guide is for development on Windows, it is not dependent on an IDE. Instead you should configure your preferred IDE accordingly by referring to the documentation. For example, you would need to install C++ tools for VSCode or configure CMake for CLion.
Environment Setup
The following pieces of software are needed to follow this guide.
- Powershell - Cross Platform utility scripts
- CMake - Build Automation
- QPM - Dependency Management
- Ninja - Build Tool
- Android NDK - Native Development Kit for Android Devices
Powershell Core
WARNING
You must download Powershell Core, the default windows Powershell will not work.
Download the latest Powershell binary for your system and add it to your PATH variable, or alternatively download and run the windows installer.
CMake
Download the latest CMake binary for your system and add it to your PATH variable, or alternatively download and run the windows installer.
QPM
Download the latest QPM binary for your system from the Actions tab, name it qpm.exe, and add it to your PATH variable, or alternatively download and run the Windows installer from the appropriate workflow.
Ninja
Download ninja via qpm using qpm download ninja.
Alternatively you can Download the latest Ninja binary for your system from the Releases tab and add it to your PATH variable.
Android NDK
Download the Andoid NDK via qpm using qpm ndk download 27, and add the extracted directory to a new environment variable called ANDROID_NDK_HOME.
Alternatively you can run qpm ndk pin 27 in a project directory to only apply the NDK in the current project.
If you wish you can instead download the NDK manually from the Android NDK Downloads page.
Create a Project
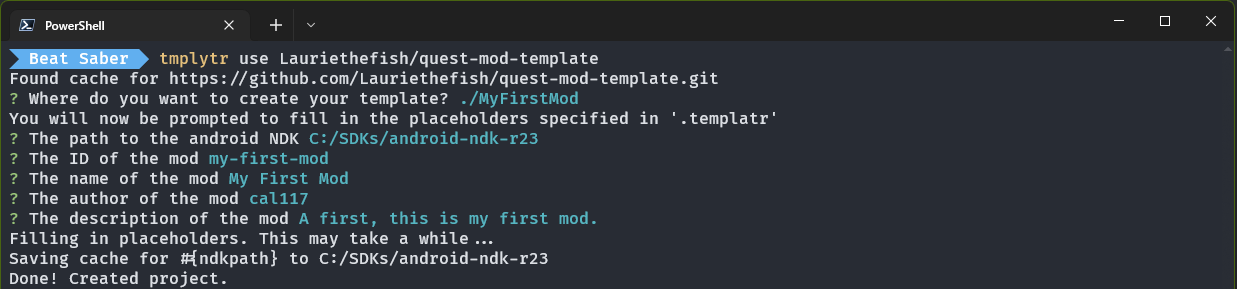
Once you have setup your environment you can now generate a mod template. The template this guide uses is one by Lauriethefish. To start run the following command in Powershell.
qpm templatr --git https://github.com/Lauriethefish/quest-mod-template.git <destination>Templatr will then ask a series of questions to create a mod project.
Add and Update Dependencies
Once the project has been generated, you should now update the following two dependencies, beatsaber-hook and bs-cordl, to the version best suited for the game version you are developing for.
beatsaber-hook is a library that allows for modding il2cpp games. bs-cordl is a library that allows modders to interface with the game's code.
To update these, open a Powershell terminal in the project directory then run the following commands to add the latest versions:
qpm dependency add beatsaber-hook
qpm dependency add bs-cordl
If the latest versions do match those for the version you are developing for, add -v ^x.x.x after the command with the correct version instead of running those commands. For example, for Beat Saber version 1.35.0, the correct codegen version is 3500.0.0:
qpm dependency add bs-cordl -v ^3500.0.0Restore Dependencies
Before you can open the project in an IDE, you must restore all of the dependencies. Consider this step similar to fully initializing the project.
In a Powershell terminal in the project directory run:
qpm restoreProject Contents
Your project should contain the following structure:
// Files in .gitignore have been excluded
cmake/
└── ... project cmake files
extern/
└── ... dependencies should be here
include/
└── main.hpp
scripts/
└── ... utility scripts
shared
src/
└── main.cpp
.gitignore
CMakeLists.txt
mod.template.json
qpm.json
README.md
Code Breakdown
src/main.cpp
main.cpp contains the setup() and late_load() methods. These methods can exist in any source file as long as they are accessible by the modloader. Take a look inside of main.cpp for more information as Laurie has thankfully commented most of the code.
shared
The shared folder can be exposed by QPM to other mods and published to the QPM dependency registry. Useful if you want to make an API to let other mods control your mod in certain ways (for example Qosmetics has a model loading API). Speak to @Sc2ad if you want to publish something.
extern
The extern folder should be ignored (and/or in some cases excluded). It contains dependencies, similarly to node_modules (nodejs) or packages (.net core).
Script Breakdown
It is recommended to run these scripts using Powershell Core (v7) - however, it is not required. All scripts can be run with the --help argument for a description of arguments and functionality. Scripts can be manually invoked from the scripts folder or via qpm scripts inside qpm.json
build.ps1
Usage: qpm s build
Builds your mod. Does not produce a QMOD file.
copy.ps1
Usage: qpm s copy
Builds your mod, then copies it to your quest and launches Beat Saber if your quest is connected with ADB.
createqmod.ps1
Usage: qpm s qmod
Generates a QMOD file that can be parsed by BMBF and or QuestPatcher. Will use the most recently built version of your mod.
pull-tombstone.ps1
Usage: qpm s tomb
Finds the most recently modified Beat Saber crash tombstone and copies it to your device. If the build on your quest matches what you have most recently built locally, the -analyze argument can be provided to generate the source file locations of any lines mentioned in the backtrace.
restart-game.ps1
Usage: qpm s restart
Closes and reopens Beat Saber on your quest if it is connected. Mostly used inside of copy.ps1. Does not have help text.
start-logging.ps1
Usage: qpm s logcat
Prints logs from Beat Saber, just your mod, or also crashes. Usage of -self is recommended.
validate-modjson.ps1
Usage: qpm s validate
Generates a mod.json from mod.template.json if not present and verifies it against the QMOD schema. Mostly used inside of createqmod.ps1. Does not have help text.
Hooking
Hooking is core to modding. beatsaber-hook provides a simple way of hooking methods and other miscellaneous stuff like constructors.
In computer programming, the term hooking covers a range of techniques used to alter or augment the behavior of an operating system, of applications, or of other software components by intercepting function calls or messages or events passed between software components. Code that handles such intercepted function calls, events or messages is called a hook. Wikipedia
To view a list of methods and classes you can hook, the most convenient option is to use a C# decompiler such as IlSpy if you own the game on PC, as it provides not only the classes and member names, but also the full contents of most methods. If you only own the game on the Quest, then you can still view all the classes and methods in the includes/codegen directory in your extern folder.
In this example, we will hook onto the initialization of the level screen and change the text on the play button to something funny.
The level screen runs the event DidActivate when it is fully initialized. This is useful for us because we can hook this event and add our own functionality.
Firstly, create your hook using the MAKE_HOOK_MATCH macro:
// You can think of these as C# - using HMUI, UnityEngine, etc, but with individual classes
// Classes without a namespace are assigned to the GlobalNamespace
// If you use a class and do not include it, you may get unclear compiler errors, so make sure to include what you use
#include "GlobalNamespace/StandardLevelDetailView.hpp"
#include "GlobalNamespace/StandardLevelDetailViewController.hpp"
#include "UnityEngine/UI/Button.hpp"
#include "UnityEngine/GameObject.hpp"
#include "HMUI/CurvedTextMeshPro.hpp"

// Create a hook struct named LevelUIHook
// targeting the method "StandardLevelDetailViewController::DidActivate", which takes the following arguments:
// bool firstActivation, bool addedToHierarchy, bool screenSystemEnabling
// and returns void.

// General format: MAKE_HOOK_MATCH(hook name, hooked method, method return type, method class pointer, arguments...) {
//     HookName(self, arguments...);
//     your code here
// }


MAKE_HOOK_MATCH(LevelUIHook, &GlobalNamespace::StandardLevelDetailViewController::DidActivate, void,
 GlobalNamespace::StandardLevelDetailViewController* self, bool firstActivation, bool addedToHierarchy, bool screenSystemEnabling) {
    // Run the original method before our code.
    // Note that you can run the original method after our code or even in the middle
    // if you want to change arguments or do something before it runs.
    LevelUIHook(self, firstActivation, addedToHierarchy, screenSystemEnabling);

    // Get the actionButton text object by accessing the actionButton field and some simple Unity methods.
    // Note that auto can be used instead of declaring the full type in many cases.
    GlobalNamespace::StandardLevelDetailView* standardLevelDetailView = self->_standardLevelDetailView;
    UnityEngine::UI::Button* actionButton = standardLevelDetailView->actionButton;
    UnityEngine::GameObject* gameObject = actionButton->get_gameObject();
    HMUI::CurvedTextMeshPro* actionButtonText = gameObject->GetComponentInChildren<HMUI::CurvedTextMeshPro*>();

    // Set the text to "Skill Issue"
    actionButtonText->set_text("Skill Issue");
}
Now, you have to install your hook. Usually, hooks are installed in load() or late_load() in main.cpp:
MOD_EXTERN_FUNC void late_load() {
    il2cpp_functions::Init();

    PaperLogger.info("Installing hooks...");

    INSTALL_HOOK(PaperLogger, LevelUIHook);

    PaperLogger.info("Installed all hooks!");
}
You can now test to see if this was successful!
Testing your Mod
Without BMBF
You can test your mod without BMBF quickly using copy.ps1. This is recommended while developing for convenience. You should always test using a QMOD and BMBF if you're about to release your mod.
Whatcopy.ps1 does specifically is copy the libmodname.so in the build folder to the correct place on your quest and then restart Beat Saber for you. You can also specify while launching to collect logs with the -log argument followed by any of the arguments supported by the start-logging.ps1 script:
copy.ps1 -log -self -file latest.logWith BMBF
Testing your mod with BMBF is useful to make sure BMBF shows and handles your QMOD correctly (copying files, version, cover, etc.)
You will need to generate a QMOD file using createqmod.ps1.
You can then upload the generated QMOD file to BMBF and it should install your mod - it should appear on the mods list.
You can still collect logs from your mod using the start-logging.ps1 command after you launch the game.
Utilizing mod.template.json
mod.template.json contains basic information on your mod. It can also allow you to define other features such as:
- Cover Image (the preview image shown on the BMBF Mods tab)
- File Copies (extract files from the QMOD to a location on the quest device)
Some fields in it will be of the form ${x} - those will be automatically filled by QPM based on the information in your qpm.json and written to the file mod.json. It's not recommended to edit the mod.json manually, and it can be updated at any time by running the command qpm qmod build (which only creates the mod.json file, not the QMOD itself.)
Cover Image
A cover image is used by certain mods and BMBF to show a preview of your mod.
To add a cover image, simply name the image cover.png, put it in your project directory, and add the following to your mod.template.json:
"coverImage": "cover.png"Cover Image Recommendations
- 1024x512 (BMBF will resize/crop the image to be this size)
- File format either png, jpg or gif
- Under 2mb to prevent load lag (larger images will take longer to show with no advantage)
Example Cover Images
Click on the arrow beside the mod name to see the image.
Noodle Extensions

Slice Details Quest
File Copies
File copies is an array that can specify extra files in your QMOD to be copied to the quest, such as sabers included by default in Qosmetics. You can add files by editing createqmod.ps1 and mod.template.json.
Example
This example will add secret-data.json to the QMOD and copy it to /sdcard/ModData/com.beatgames.beatsaber/Mods/Secret/secret-data.json
Edit createqmod.ps1 to include secret-data.json:
# This is after line 59 of createqmod.ps1
$filelist += "/path/to/secret-data.json"
Update the following in your mod.template.json:
"fileCopies": [
    {
        "name": "secret-data.json",
        "destination": "/sdcard/ModData/com.beatgames.beatsaber/Mods/Secret/secret-data.json"
    }
]
Mod Configuration
Most mods require a configuration to allow users to change the functionality of the mod.
Visit the Quest Mod Configuration page to learn the basics of using config-utils to create a configuration for your mod.
Custom Types
custom-types is a library that allows you to create the equivalent of C# types using macros. These types can extend classes such as MonoBehaviour and much more. custom-types also allows you to create and use coroutines and delegates.
Custom Types are complex and requires knowledge of basic C#. Visit the Quest Custom Types page to learn more about integrating this into your mod.
User Interface
A user interface (UI) is used by many mods to show configuration options. Visit the Quest User Interface page to see how to use bsml to create a settings screen for your mod.
Credits
Initial guide content was integrated from the Beat Saber Quest Modding Guide by Calum with contributions from Raine, Pangwen, and Metalit. Integration and editing was done by Bloodcloak.